
| 일 | 월 | 화 | 수 | 목 | 금 | 토 |
|---|---|---|---|---|---|---|
| 1 | ||||||
| 2 | 3 | 4 | 5 | 6 | 7 | 8 |
| 9 | 10 | 11 | 12 | 13 | 14 | 15 |
| 16 | 17 | 18 | 19 | 20 | 21 | 22 |
| 23 | 24 | 25 | 26 | 27 | 28 | 29 |
| 30 |
- 논리 연산자
- var 변수
- IF else
- Math 함수
- switch-case
- 변수 기본형
- 배열 array
- 관계 연산자
- 변수
- 삼항(조건) 연산자
- 반복문
- decimalformat
- 가위바위보 게임
- 형변환 연산자
- 업다운 게임
- 할당 연산자
- 표 구현
- Do while
- Style Sheet
- count_program
- 접근제한자
- Scanner
- DropDown
- 간단한 연산
- 컬렉션프레임워크
- 유효성 검사
- 객체 배열
- color code
- SQLIntegrityConstraintViolationException
- 문자열 비교
- Today
- Total
무룩 공부방
[HTML] EX1) 표만들기 + 화면구현 (Notepad++/Java Script) 본문
Notepad++로 예제를 클론코딩 하며 실습위주의 학습을 진행했습니다.
앞으로 HTML을 본격적으로 학습하기전, 실습위주의 클론코딩을 통해 코딩과 친숙해지며
명령어나 구조에 대해 최대한 이해하기 위해 노력할 것입니다.
<html의 기본 구조>
<!doctype html>
<html>
	<head>

	</head>
	<body>

	</body>
</html>
* 괄호를 사용할때 열고 닫고를 습관화 해야 실수 방지에 좋다.
<style sheet를 코드내에 삽입하는 경우>
	<head>
		<title>표 만들기</title>
		<style>
			table,th,td {border:1px solid #ccc;}
			.pyo {width:780px; margin:0 auto;}
			.pyo td {text-align:center;}
			.h3 {text-align:center;}
			.member {width:600px; margin:0 auto;}
			.navi {width:800px; padding:12px 0; margin:0 auto;}
			.navi h1 {display:inline-block; padding-rihgt:100px}
			.navi a {display:inline-block; padding:12px 16px; text-decoration:none; color:#333;}
			.navi a:hover {background:#F78181; color:#fff;}
		</style>
border : 테두리
solid : 단색
width : 좌우길이
margin : 바깥여백
padding : 안쪽여백
text-align:center : text 가운데 정렬
display:inline-block : inline을 block으로 변경 (추후 공부)
background : 배경
* style을 본문에 삽입할 수 있다.
<Source code>
<body>
<div class="navi">
<nav>
<h1>Portfolio</h1>
<a href="company.html">회사소개</a>
<a href="board.html">게시판</a>
<a href="member.html">회원가입</a>
<a href="login.html">로그인</a>
</nav>
</div>
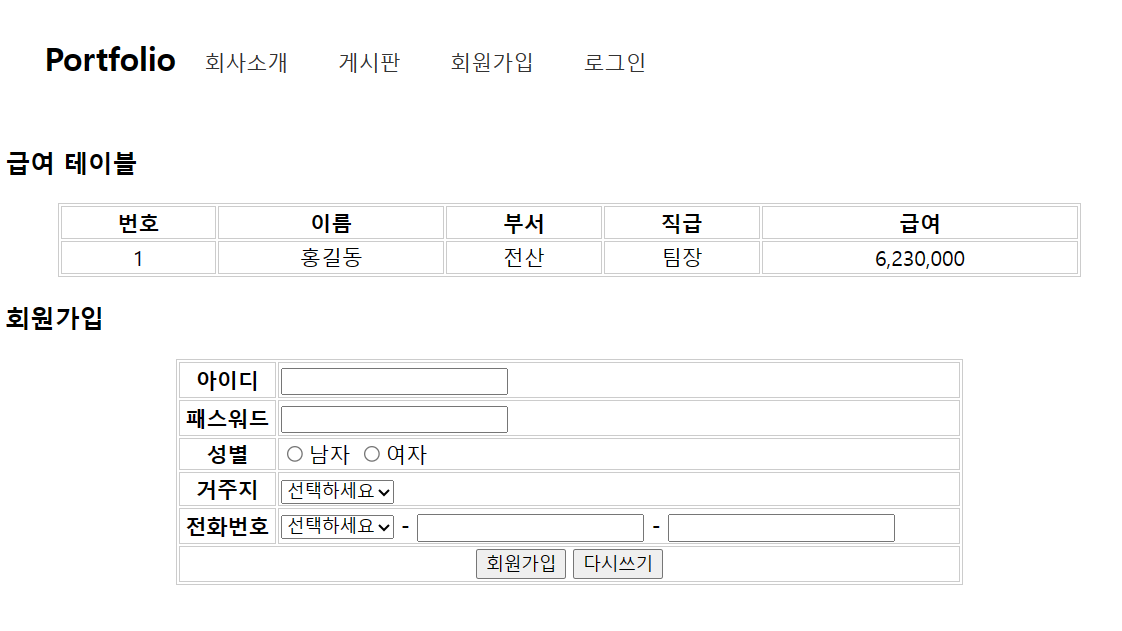
<h3>급여 테이블</h3>
<table class="pyo">
<tr>
<th>번호</th>
<th>이름</th>
<th>부서</th>
<th>직급</th>
<th>급여</th>
</tr>
<tr>
<td>1</td>
<td>홍길동</td>
<td>전산</td>
<td>팀장</td>
<td>6,230,000</td>
</tr>
</table>
<form name="my" method="post" action="/result.html" onsubmit="return check()">
<h3>회원가입</h3>
<table class="member">
<tr>
<th>아이디</th>
<td><input type="text" name="id"></td>
</tr>
<tr>
<th>패스워드</th>
<td><input type="password" name="pwd"></td>
</tr>
<tr>
<th>성별</th>
<td>
<input type="radio" name="gender" value="t">남자
<input type="radio" name="gender" value="f">여자
</td>
</tr>
<tr>
<th>거주지</th>
<td>
<select name="city">
<option>선택하세요</option>
<option value="02">서울특별시</option>
<option value="042">대전광역시</option>
</select>
</td>
</tr>
<tr>
<th>전화번호</th>
<td>
<select name="tell">
<option>선택하세요</option>
<option value="010">010</option>
<option value="017">017</option>
</select> -
<input type="text" name="tel2"> -
<input type="text" name="tel3">
</td>
</tr>
<tr>
<td colspan="2" style="text-align:center;">
<button type="submit">회원가입</button>
<button type="reset">다시쓰기</button>
</td>
</tr>
</table>
</form>
</body>- div로 메뉴를 블록화하여 메뉴를 nav로 블록화 한 뒤, a태그로 링크를 연결
- tr (각 테이블의 행을 정의) // th (테이블 헤더셀을 정의)
- 아이디, 비밀번호, 성별, 거주지, 전화번호를 input으로 받고 그 값들을 class "member"로 묶어서 관리
- 전화번호 탭에서 select에 option을 추가 (option값을 선택하면 해당하는 값을 value로 저장)
<화면 구현>
<유효성 검사>
		<script>
			//alert("필수 항목을 반드시 입력해 주세요");
			function check() {
				if(document.my.id.value == "") {
					alert("아이디를 입력하세요");
					my.id.focus();
					return false;
				}
			}
		</script>
본문 head 탭에 유효성 검사를 위한 <script>를 추가 하였습니다.
회원가입 버튼을 눌렀을때 onsubmit을 통해 function에 진입하게 됩니다.
document.my.id.value 값이 비어있을 경우에 아래의 경고문을 출력합니다.
my.id.focus();를 통해 id를 입력할수 있게 해당 입력칸으로 커서를 유도하고 false값을 return 합니다.
'IT > HTML' 카테고리의 다른 글
| [HTML] EX6) 반복문을 통한 count program (Notepad++/Java Script) (0) | 2023.08.22 |
|---|---|
| [HTML] EX5) style과 function (Notepad++/Java Script) (0) | 2023.08.22 |
| [HTML] EX4) 키보드 입력과 let (Notepad++/Java Script) (1) | 2023.08.22 |
| [HTML] EX3) 변수 선언과 연산 (Notepad++/Java Script) (0) | 2023.08.21 |
| [HTML] EX2) 표 만들기와 유효성 검사 (Notepad++/Java Script) (0) | 2023.08.21 |


